Learner Licence Apply Online: Sarathi Step-by-Step
A quick note from me: I have personally helped three family members apply for their learner licence through the Sarathi portal — my younger brother last year, my cousin in Maharashtra, and my neighbour’s daughter who was terrified of the online test. I have also made mistakes along the way and spent frustrating afternoons staring at “pending” screens. Everything I have written below comes from real experience, not just copy-pasted government instructions.
Why a Learner Licence Is Not “Just a Formality”
Let me be straight with you. A lot of people treat the learner licence as a small hurdle — something you clear in a week and forget about. I used to think the same. Then my cousin applied for his permanent DL after learning to drive perfectly well for three months, and the officer simply refused to process it. Why? Because his learner licence window had already closed.
Here is what the Motor Vehicles Act actually says: you cannot legally apply for a permanent driving licence unless you hold a valid learner licence. Full stop. It does not matter how confidently you drive, how many hours you have practised, or how many years your uncle has been driving. Without that LL, your permanent DL application is legally invalid — the Sarathi portal will not even let you submit it.
The LL is also the document that makes your practice legal. If you are behind the wheel without one and something goes wrong — even a minor scrape — your insurance claim can be rejected. The police can fine you. The LL is your legal right to be on the road while you learn, and it is the foundation that everything else is built on.
Key Timeline to Remember: You must apply for your permanent DL not earlier than 30 days after your LL is issued. And you must apply within 180 days (6 months) before the LL expires. Miss that window and you start from scratch.
Before You Open the Portal: What You Actually Need
I have seen people spend an hour on the Sarathi portal only to get stuck at the document upload step because they were not prepared. Do this five-minute check before you even open a browser tab.
Documents — It Is Simpler Than You Think
The most common question I get is: “What documents do I need?” The honest answer for most people in 2026 is: just your Aadhaar card.
Aadhaar is accepted by the Sarathi portal as both age proof and address proof simultaneously. You do not need a separate electricity bill or ration card or voter ID. If your Aadhaar is linked to your mobile number (which most are), you are essentially ready to go with a single document. This is genuinely one thing the government got right.
The only times you will need an additional document are if your Aadhaar does not show your current address, or if for some reason the Aadhaar database throws a mismatch (I will cover that in the troubleshooting section). In those edge cases, a valid passport, voter ID, or recent electricity bill will work as the address proof substitute.
Minimum Document Checklist:
- Aadhaar card (serves as both age proof + address proof)
- Mobile number linked to Aadhaar (for OTP)
- Your photo — scanned or a clear mobile click against white background
- Signature on plain white paper — scanned or photographed clearly
- If choosing Aadhaar face authentication: a device with a working front camera
Choosing the Right Vehicle Category (This Is Where People Lose Money)
I need to spend a moment here because this is where I see the most expensive mistakes. People select the wrong vehicle category, pay the fee, and either have to start over or end up with a licence that does not match what they actually drive.
Vehicle Categories:
- MCWOG — Motorcycle Without Gear: Activa, Jupiter, Dio — gearless scooters
- MCWG — Motorcycle With Gear: Splendor, Pulsar, Royal Enfield — any gear bike
- LMV — Light Motor Vehicle: Cars, SUVs, small pickup trucks
The rule I always tell people: if you ride a gearless scooter and have no plans to ever ride a gear bike, just select MCWOG. It is cheaper and the test is simpler. If you want flexibility to ride both types of two-wheelers in the future, select MCWOG + MCWG. If you only want a car licence, select LMV alone. You can always add categories later, but that means paying again — so think ahead before you click.
Common Mistake: Selecting all three categories (MCWOG + MCWG + LMV) when you only own a scooter. You pay ₹150 per category. Selecting categories you do not need just means spending ₹300 extra for no practical benefit. Be deliberate here.
The Fee Breakdown: What You Actually Pay
Nobody explains this clearly, so let me do it. The Sarathi fee structure is straightforward once you understand it is split into two parts: an application fee per vehicle category, and a separate test fee.
| Item | Amount | Note |
| LL Application fee | ₹150 per category | Multiply by number of categories selected |
| LL Test fee | ₹50 | Paid once per test attempt |
| Retest fee (if you fail) | ₹50 per attempt | No refund on failed attempts |
| Typical total (1 category) | ₹200 | e.g., just LMV or just MCWOG |
| Typical total (2 categories) | ₹350 | e.g., MCWOG + LMV |
All of this is payable online — UPI, net banking, and debit/credit cards all work on the Sarathi payment gateway. I have used UPI (Google Pay and PhonePe both) without any issue. If the payment screen freezes, wait 10 minutes before trying again; the system sometimes takes a moment to register, and you do not want a double charge.
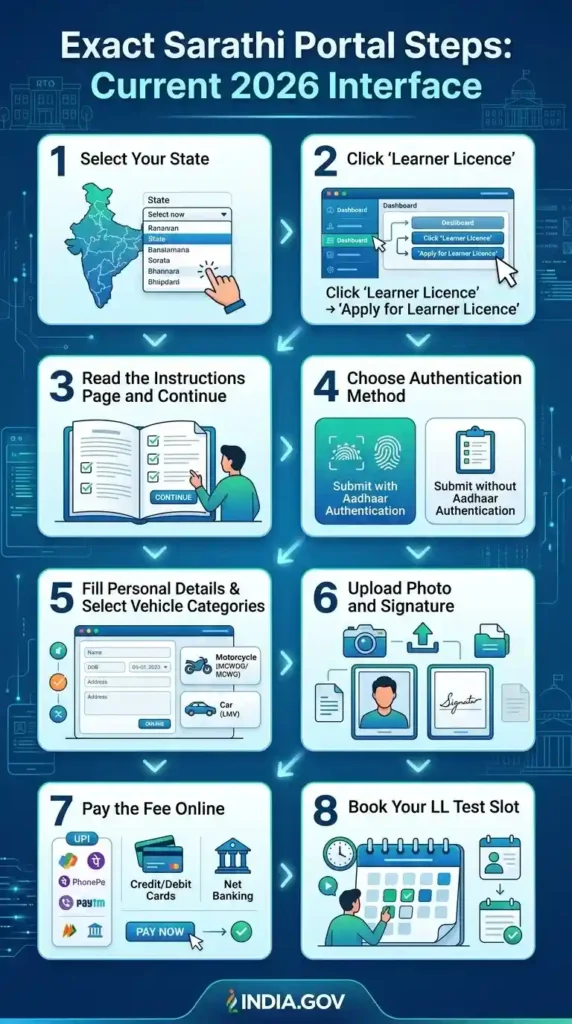
Exact Sarathi Portal Steps: Current 2026 Interface
Open sarathi.parivahan.gov.in — that is the official URL, nothing else. A lot of fake look-alike websites exist that charge extra “service fees.” You want the gov.in domain, always.
Step 1 — Select Your State
The very first thing on the Sarathi homepage is a state selector dropdown. Choose your home state carefully — this determines your RTO jurisdiction. If you get this wrong, your whole application may be linked to the wrong RTO.
Step 2 — Click “Learner Licence” → “Apply for Learner Licence”
After selecting the state, you will see a dashboard. Look for the “Learner Licence” menu in the left or top navigation. Click it, then select “Apply for Learner Licence” — not “services on existing LL,” not “print LL.” The first option in that submenu.
Step 3 — Read the Instructions Page and Continue
There is an instructions page with a checklist. Most people skip this completely. I recommend actually reading it — it mentions any state-specific requirements that may differ from the general process. Check all the boxes and click Continue.
Step 4 — Choose Authentication Method
Here is where a critical decision happens. You will see two options: “Submit with Aadhaar Authentication” or “Submit without Aadhaar Authentication.” Always choose with Aadhaar if you can — it auto-fills your name, date of birth, and address, and it unlocks the online home test option in supported states.
Step 5 — Fill Personal Details & Select Vehicle Categories
Enter your details, select your RTO, and choose your vehicle category (MCWOG, MCWG, LMV — as discussed above). Double-check the RTO code — it should match the district where you currently live.
Step 6 — Upload Photo and Signature
Photo must be a recent passport-size image — plain background, face clearly visible. Signature should be on white paper, scanned or photographed in decent light. File size limits apply (usually under 50KB for photo, under 30KB for signature). If your file is too large, use an image compressor.
Step 7 — Pay the Fee Online
UPI, debit card, or net banking. Note down the transaction ID once payment is successful. The portal should redirect you back with a confirmation page — take a screenshot of this page.
Step 8 — Book Your LL Test Slot
After payment, you book either an online test slot (if your state supports Aadhaar face authentication tests from home) or an RTO visit slot. Pick a date and time that works for you. You will get an appointment confirmation — save it.
The Home Test Option: Aadhaar Face Authentication
This is something I genuinely get excited telling people about, because most still do not know it exists. In many states, if you authenticated your application via Aadhaar, you can now take the entire learner licence test from home — no RTO visit needed whatsoever.
The system is called STALL (Software for Transport Application of Learner’s Licence) in some states. You sit at your computer or laptop, your webcam is switched on, the portal performs a face scan to verify you are the same person who applied, and then it presents you with the online question test. Answer them, pass, and your LL is generated digitally. You never step outside.
I know people who are working professionals and would have had to take a day off just for an RTO visit. The home test saved them that entirely. The checklist for this:
- Laptop or desktop with a working front camera (mobile is not supported by most state portals)
- Good room lighting — the system rejects you if the face is not clearly visible
- Plain background behind you; no other person should be visible in the frame
- Quiet environment; dress properly (the test is proctored via webcam)
- Aadhaar must have been used during application submission for face matching to work
- Stable internet connection — a dropped connection mid-test can flag your session
If your state does not offer the home test yet, do not worry — RTO visits for the LL test are short. You show up at the booked time, sit at a computer terminal, answer the questions, and you are done. The whole thing takes under 30 minutes at the RTO.
Mock Test Preparation: The Section Every Other Site Skips
Here is the honest truth: most people fail the learner licence test not because it is difficult, but because they walked in completely cold. The questions are not hard once you have seen the pattern. I spent one evening going through the RTO question bank before my brother’s test, and he cleared it on the first attempt easily.
The test typically has 15–20 questions. You need to answer at least 12 correctly to pass (the passing threshold is around 60%, though this can vary by state). Questions come from four main topic areas:
Road Signs (Most Heavily Tested)
- Mandatory signs (circular, red border) — Stop, No Entry, Speed Limit
- Cautionary signs (triangular, yellow background) — School Ahead, Speed Breaker
- Informatory signs (rectangular, blue/green background) — Parking, Petrol pump
- The difference between a “No Parking” and “No Stopping” sign confuses many people — study both
Speed Limits
- In residential areas and near schools: 25–30 km/h
- On urban roads: typically 50 km/h
- On highways: 80–100 km/h for LMV; varies by state and road type
- Questions often ask: “what is the maximum speed near a school zone?” — know this cold
Pedestrian & Right-of-Way Rules
- At a zebra crossing, you must always stop and give way to pedestrians
- At an uncontrolled intersection, the vehicle on the right has priority
- Emergency vehicles (ambulance, fire engine) always have priority — you must pull over
- You cannot park within 5 metres of a pedestrian crossing
Basic Vehicle Rules & Signals
- Headlights at night — when to dim for oncoming vehicles
- Hand signals — right turn, left turn, slowing down
- Overtaking rules — when it is illegal (near a bend, on a solid white line)
- Seatbelt and helmet rules — mandatory for driver and all occupants
My Preparation Tip: Go to the Sarathi portal → select your state → “Tutorial for LL Test”. There is an official practice module embedded in the portal itself. Do it two or three times on different days and you will recognise the question patterns on the actual test day. Takes about 20 minutes per session.
What Happens If You Fail the LL Test
I want to cover this properly because I have seen people completely panic after a failed first attempt, thinking they need to reapply from scratch, pay all the fees again, and wait weeks. That is not what happens.
Failing the learner licence test is not the end of the road. Here is exactly what the process looks like:
Cooling period: You must wait 7 days before you can book a retest slot. This is the standard gap across most states as of 2025–2026, though your specific RTO may occasionally differ slightly.
Number of attempts: There is no hard limit on total attempts, but the important rule is this — if you fail three times, you must wait 60 days from your last attempt before booking again. Within the first three attempts, the 7-day gap applies between each.
The fee situation: Yes, you pay the ₹50 test fee again for each retest. No, you do not pay the ₹150 application fee again — that has already been paid and is linked to your application number. And no, the test fee is not refunded if you fail — this is the same across all RTOs, and I have seen many people try to get a refund and fail. Budget for it mentally.
Do you need to re-upload documents? No. Your existing application stays active. You just book a new test slot through the Sarathi portal under your existing application number, pay the retest fee, and appear again.
Retest Quick Reference:
- Wait: 7 days between first and second attempt (and second to third)
- After 3 fails: wait 60 days before attempting again
- Fee: ₹50 per retest, non-refundable
- No need to upload documents again
- Book retest via: Sarathi → Your State → Appointments → Slot Booking for LL Test
After You Pass: When Exactly Can You Apply for Permanent DL?
You pass the test. Your learner licence is issued. Now the most common question I get: “Can I apply for my permanent DL immediately?”
The answer is no, and the reason is written into the Motor Vehicles Act. The law requires you to hold the LL for a minimum of 30 days before you can even submit a permanent DL application. This is not bureaucratic delay — it is intentional. The 30-day window is meant for you to actually practice driving under supervision before you go for the permanent test.
The other end of the deadline matters more: you must apply for your permanent DL before your LL crosses 180 days (6 months). If you let that window pass — whether because you got busy, forgot, or kept postponing — your LL expires and you start the entire process from zero. No extensions. No grace period. I have seen this happen to at least two people I know personally.
So the practical window is: Day 30 to Day 180 from your LL issue date. That is your permanent DL application window. Mark it in your calendar the day your LL is issued.
How to Download Your Learner Licence
Once your LL is issued (either instantly after an online test or within a few days after an RTO visit), you can download it in two ways:
Option 1: Directly from the Sarathi Portal
Go to sarathi.parivahan.gov.in → select your state → Learner Licence → Print Learner Licence (Form 3) → enter your application number and date of birth → download the PDF. Print it and keep a copy in your vehicle when practising.
Option 2: From DigiLocker
Open DigiLocker (digilocker.gov.in or the app) → sign in with your Aadhaar-linked mobile → search for “Learner Licence” under “Issued Documents” → it should appear there if your state has synced with the National Register. In most states, the LL appears in DigiLocker within 24–48 hours of issuance. A DigiLocker copy is legally valid as per the IT Act — you do not need a physical printout if you have this.
Pro Tip: Always keep both — a physical printout and the DigiLocker version. Some traffic officers during practice drives may not be familiar with DigiLocker on the spot. A printed copy saves you a fifteen-minute roadside argument.
Troubleshooting: The Real Problems Nobody Documents Properly
This section is for the people who are stuck. Real issues, real fixes — from my own experience and from what I have seen others go through.
Aadhaar Mismatch Blocking Your Application
This is the most frustrating one. It happens when the name or date of birth in your Aadhaar database does not exactly match what you typed. The portal does a live authentication against UIDAI records. Common triggers: name with initials vs. full name, date of birth showing “0” vs “00”, or a name with a different spelling than what UIDAI has on file. Fix: go to the UIDAI website first, check your exact name and DOB as recorded, and type it identically in the Sarathi form. If the data in UIDAI itself is wrong, you need to update it there first before proceeding.
OTP Not Arriving on Mobile
This usually happens for one of three reasons: your mobile number is not linked to Aadhaar, the number linked is old and you no longer have access to it, or the UIDAI OTP servers are temporarily overloaded (this genuinely happens during peak hours). For the first two, you will need to visit an Aadhaar enrollment centre to update your mobile number — there is no online fix for this. For server overload, simply wait 20–30 minutes and try again. Avoid applying between 10 AM and 1 PM on weekdays — that is the peak traffic window.
Application Showing “Pending” for Weeks
After submission and fee payment, some applications sit in “pending” or “under process” status for an unusually long time. This typically happens when the RTO has a backlog, or when there was a technical error in document upload that was not flagged to you. First step: check your application status on the Sarathi portal using your application number. If it shows “Pending at RTO” for more than 15 working days, visit the RTO directly with your application number and payment receipt. Most cases get resolved in a single visit once you speak to the dealing clerk at the licence section.
Payment Deducted but Application Not Generated
This is scary but more common than it should be. Your bank shows the debit, but the Sarathi portal shows no successful application. Wait 24 hours — sometimes there is a reconciliation delay. If after 24 hours the application still does not appear, go to Sarathi → Check Payment Status → enter your transaction ID. If it shows “success” on the portal side but no application was created, contact the Sarathi helpline at 0120-2459169 with the transaction reference. Keep your bank SMS handy.
Quick Reference Summary
| Detail | Info |
| Minimum age | 18 years (16 for MCWOG only) |
| Portal URL | sarathi.parivahan.gov.in |
| Application fee | ₹150 per vehicle category |
| Test fee | ₹50 per attempt |
| Payment mode | UPI / Net Banking / Debit Card |
| LL validity | 6 months (180 days) |
| Earliest permanent DL application | 30 days after LL issue |
| Retest gap | 7 days; 60 days after 3 fails |
| Fee refund on fail | No — non-refundable |
| Download LL from | Sarathi portal or DigiLocker |
Get mParivahan Vehicle Details with correct guide!
One Last Thing Before You Start
The entire process — from opening the Sarathi portal to having your LL in hand — can genuinely be done in under an hour if you are prepared and your state supports the home test. I have seen people overthink this and delay for months because they were not sure of the steps or were intimidated by the “government portal” reputation.
My honest advice: do your vehicle category thinking upfront, keep your Aadhaar mobile-linked and handy, spend one evening on the official Sarathi practice test module, and then just do it. The portal is far less scary in 2026 than it was a few years ago. And the home test option, where available, has genuinely removed the biggest friction point — the RTO visit.
If something goes wrong at any step, the troubleshooting section above should get you unstuck. And once that LL is in your DigiLocker — even if it feels like a small thing — it is your legal right to be on the road while you learn. That is not a formality. That is actually worth having.
All fees and rules mentioned reflect the Sarathi portal and Central Motor Vehicles Rules as of early 2026. Some states may have minor variations in fee amounts or test formats — always verify the final fee on the official Sarathi portal before completing payment.